Hexo简介
Hexo是一款基于Node.js的静态博客框架,依赖少易于安装使用,可以方便的生成静态网页托管在GitHub和Coding上,是搭建博客的首选框架。大家可以进入Hexo官网进行详细查看。
Hexo搭建步骤
- 安装Git和Node.js
- 安装Hexo
- 配置Github Actions
Git和Node.js基础环境正常安装即可,只需要对Github做一下密钥登录,相关操作在网上有大量博客,不再赘述。
安装Hexo
安装hexo-cli脚手架
npm install -g hexo-cli
创建博客根目录
mkdir blog
初始化博客仓库
hexo init blog
新建完成后,指定文件夹目录下有:
node_modules: 依赖包public:存放生成的页面scaffolds:生成文章的一些模板source:用来存放你的文章,MarkDown格式的文章,在hexo g生成时,会被自动构建出网页版,存放在public目录下themes:主题目录_config.yml: 博客的配置文件,具体配置参考官方,以下是我的配置Hexo Configuration
# Docs: https://hexo.io/docs/configuration.html
# Source: https://github.com/hexojs/hexo/
Site
title: Duncan's Blog
subtitle: '记录学习 分享生活 品味人生'
description: '吾生也有涯,而知也无涯,以有涯随无涯,殆己!已而为知者,殆而已矣。'
keywords:
author: Wang Fanming
language: zh-CN
timezone: 'Asia/Shanghai'
URL
# Set your site url here. For example, if you use GitHub Page, set url as 'https://username.github.io/project'
url: https://www.wfanming.top
root: /
permalink: :year/:month/:day/:title/
permalink_defaults:
pretty_urls:
trailing_index: true # Set to false to remove trailing 'index.html' from permalinks
trailing_html: true # Set to false to remove trailing '.html' from permalinks
Directory
source_dir: source
public_dir: public
tag_dir: tags
archive_dir: archives
category_dir: categories
code_dir: downloads/code
i18n_dir: :lang
skip_render:
Writing
new_post_name: :title.md # File name of new posts
default_layout: post
titlecase: false # Transform title into titlecase
external_link:
enable: true # Open external links in new tab
field: site # Apply to the whole site
exclude: ''
filename_case: 0
render_drafts: false
post_asset_folder: false
relative_link: false
future: true
syntax_highlighter: highlight.js
highlight:
line_number: false
auto_detect: false
tab_replace: ''
wrap: true
hljs: false
prismjs:
preprocess: false
line_number: true
tab_replace: ''
Home page setting
path: Root path for your blogs index page. (default = '')
per_page: Posts displayed per page. (0 = disable pagination)
order_by: Posts order. (Order by date descending by default)
index_generator:
path: ''
per_page: 10
order_by: -date
Category & Tag
default_category: uncategorized
category_map:
tag_map:
Metadata elements
# https://developer.mozilla.org/en-US/docs/Web/HTML/Element/meta
meta_generator: true
Date / Time format
# Hexo uses Moment.js to parse and display date
# You can customize the date format as defined in
# http://momentjs.com/docs/#/displaying/format/
date_format: YYYY-MM-DD
time_format: HH:mm:ss
# updated_option supports 'mtime', 'date', 'empty'
updated_option: 'mtime'
Pagination
# Set per_page to 0 to disable pagination
per_page: 10
pagination_dir: page
Include / Exclude file(s)
# include:/exclude: options only apply to the 'source/' folder
include:
exclude:
ignore:
Extensions
# Plugins: https://hexo.io/plugins/
# Themes: https://hexo.io/themes/
theme: next
Deployment
# Docs: https://hexo.io/docs/one-command-deployment
deploy:
type: 'git'
repo: git@github.com:wangfanming/wangfanming.github.io.git
branch: main
symbols_count_time:
文章内是否显示
symbols: true
time: true
网页底部是否显示
total_symbols: true
total_time: true
通用站点地图
sitemap:
path: sitemap.xml
百度站点地图
baidusitemap:
path: baidusitemap.xml
安装相关环境依赖
cd blog/
npm install
启动模板,检查初始化是否正常
hexo s
安装配置Next主题 ,其他主题配置一样的方法
- 安装
进入博客根目录
cd blog/
下载自己喜欢的主题到Hexo主题目录 `themes/`
git clone https://github.com/theme-next/hexo-theme-next themes/next- 在博客配置文件_config.yml中启用Next主题
## Themes: https://hexo.io/themes/
theme: next #主题改为next- 对Next主题的相关配置参考官网即可
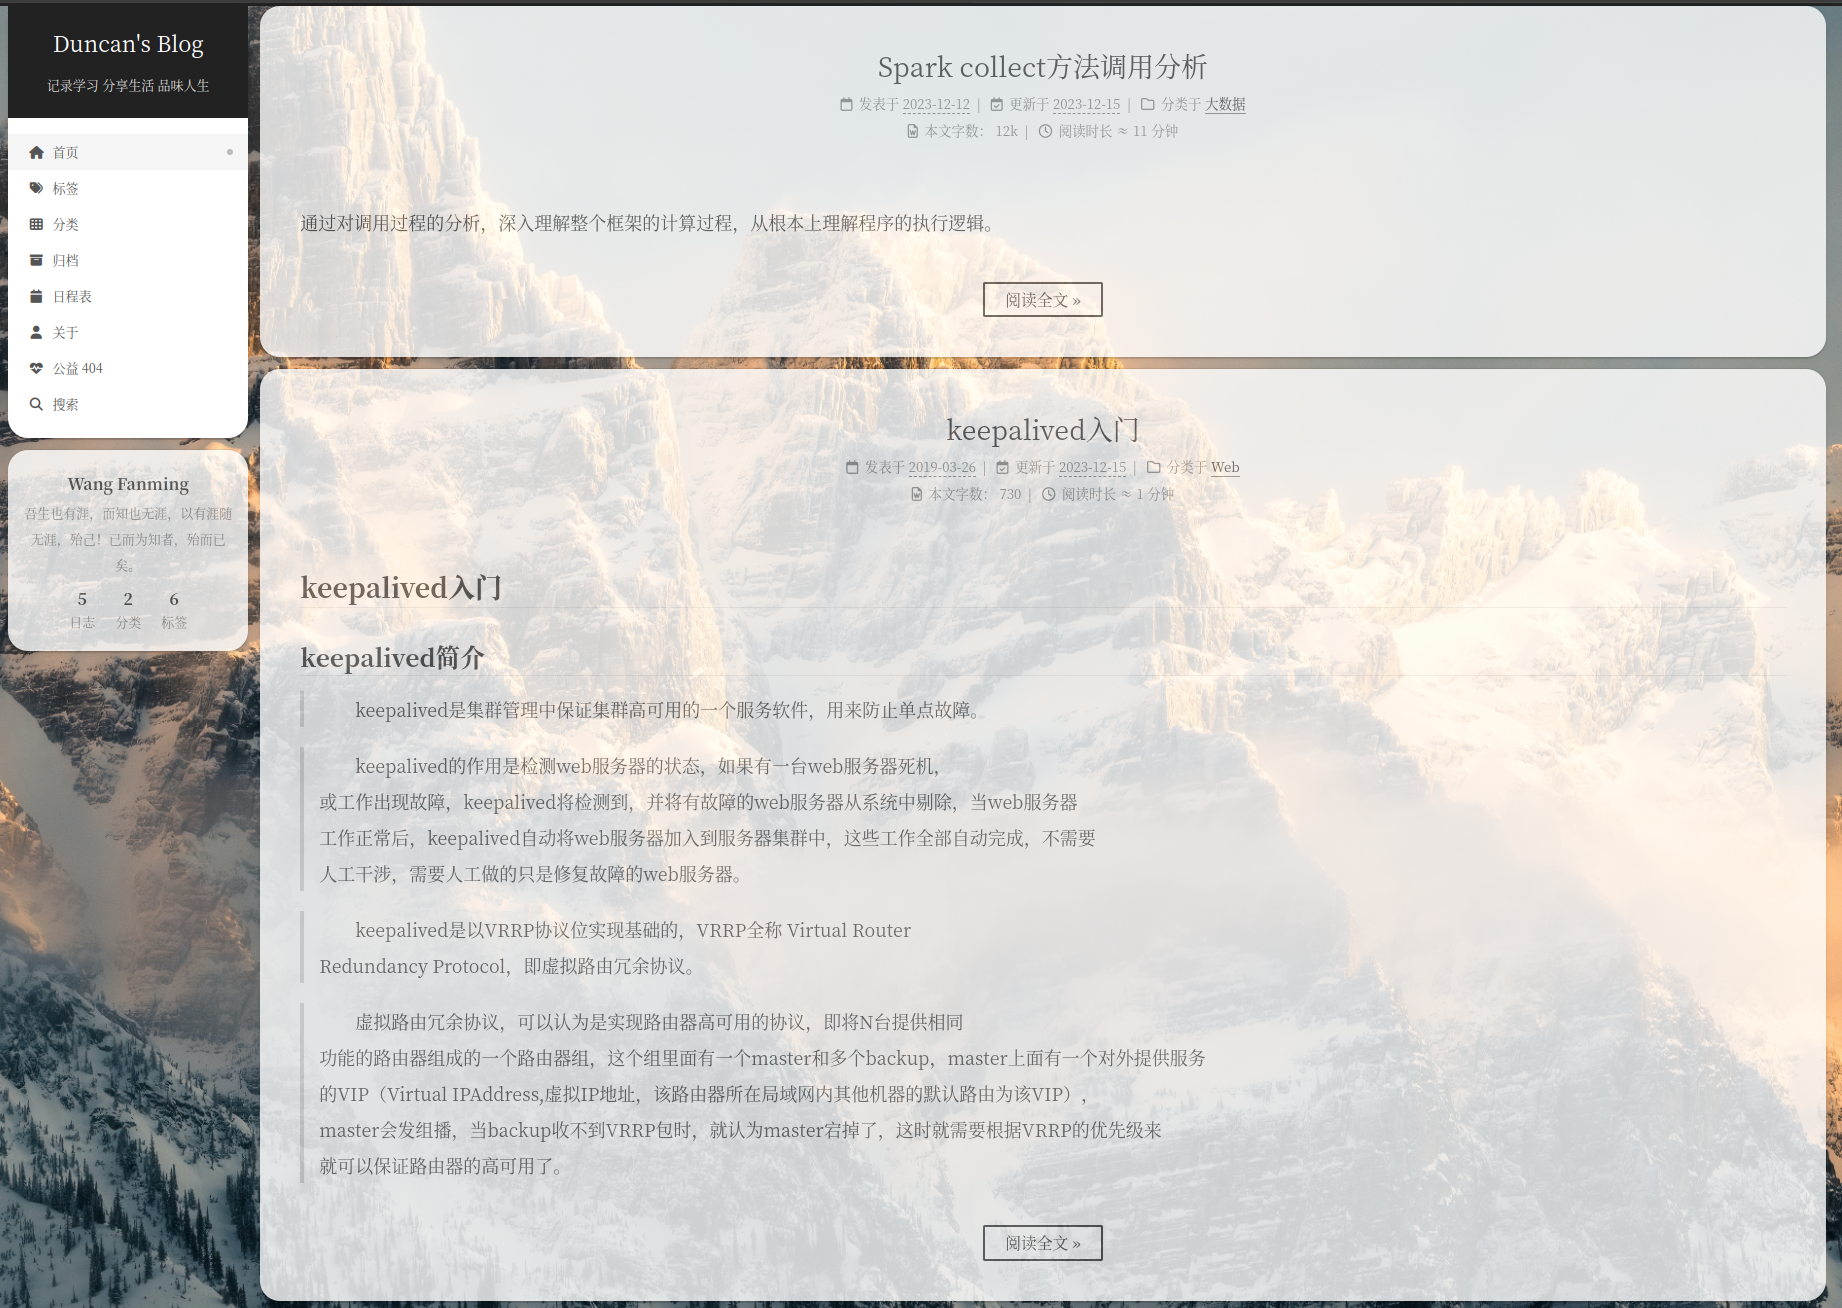
部署至本地测试一下,正常输出如下:

上传博客
将书写好的MarkDown博客移至source/_posts
构建网页,并部署
hexo clean
hexo g
hexo d- 部署至Github前,必须保证远程仓库密钥配置成功
配置Github Actions
上述博客发布过程,每次必须编译然后进行上传,流程繁琐,且存在本地Node.js升级后与Hexo不匹配的问题,因此可以考虑使用Github Actions的持续集成能力来完成这个自动化过程。
介绍
Github Actions 可以很方便实现 CI/CD 工作流,类似 Travis 的用法,来帮我们完成一些工作,比如实现自动化测试、打包、部署等操作。当我们运行 Jobs 时,它会创建一个容器 (runner),容器支持:Ubuntu、Windows 和 MacOS 等系统,在容器中我们可以安装软件,利用安装的软件帮我们处理一些数据,然后把处理好的数据推送到某个地方。
本文将介绍利用 Github Actions 实现自动部署 hexo 到 Github Pages,在之前我们需要写完文章执行 hexo generate --deploy 来部署,当你文章比较多的时候,可能还需要等待很久,而且还可能会遇到本地安装的 Node.js 版本与 Hexo 不兼容的问题,目前我就是因为电脑的 Node.js 版本升到 v14 版本导致与 Hexo 不兼容部署不了,才来捣腾 Github Actions 功能的。利用 Github Actions 你将会没有这些烦恼。
前提
创建所需仓库
- 创建
blog仓库用来存放 Hexo 项目 - 创建
your.github.io仓库用来存放静态博客页面
生成部署密钥
一路按回车直到生成成功
$ ssh-keygen -f github-deploy-key |
当前目录下会有 github-deploy-key 和 github-deploy-key.pub 两个文件。
配置部署密钥
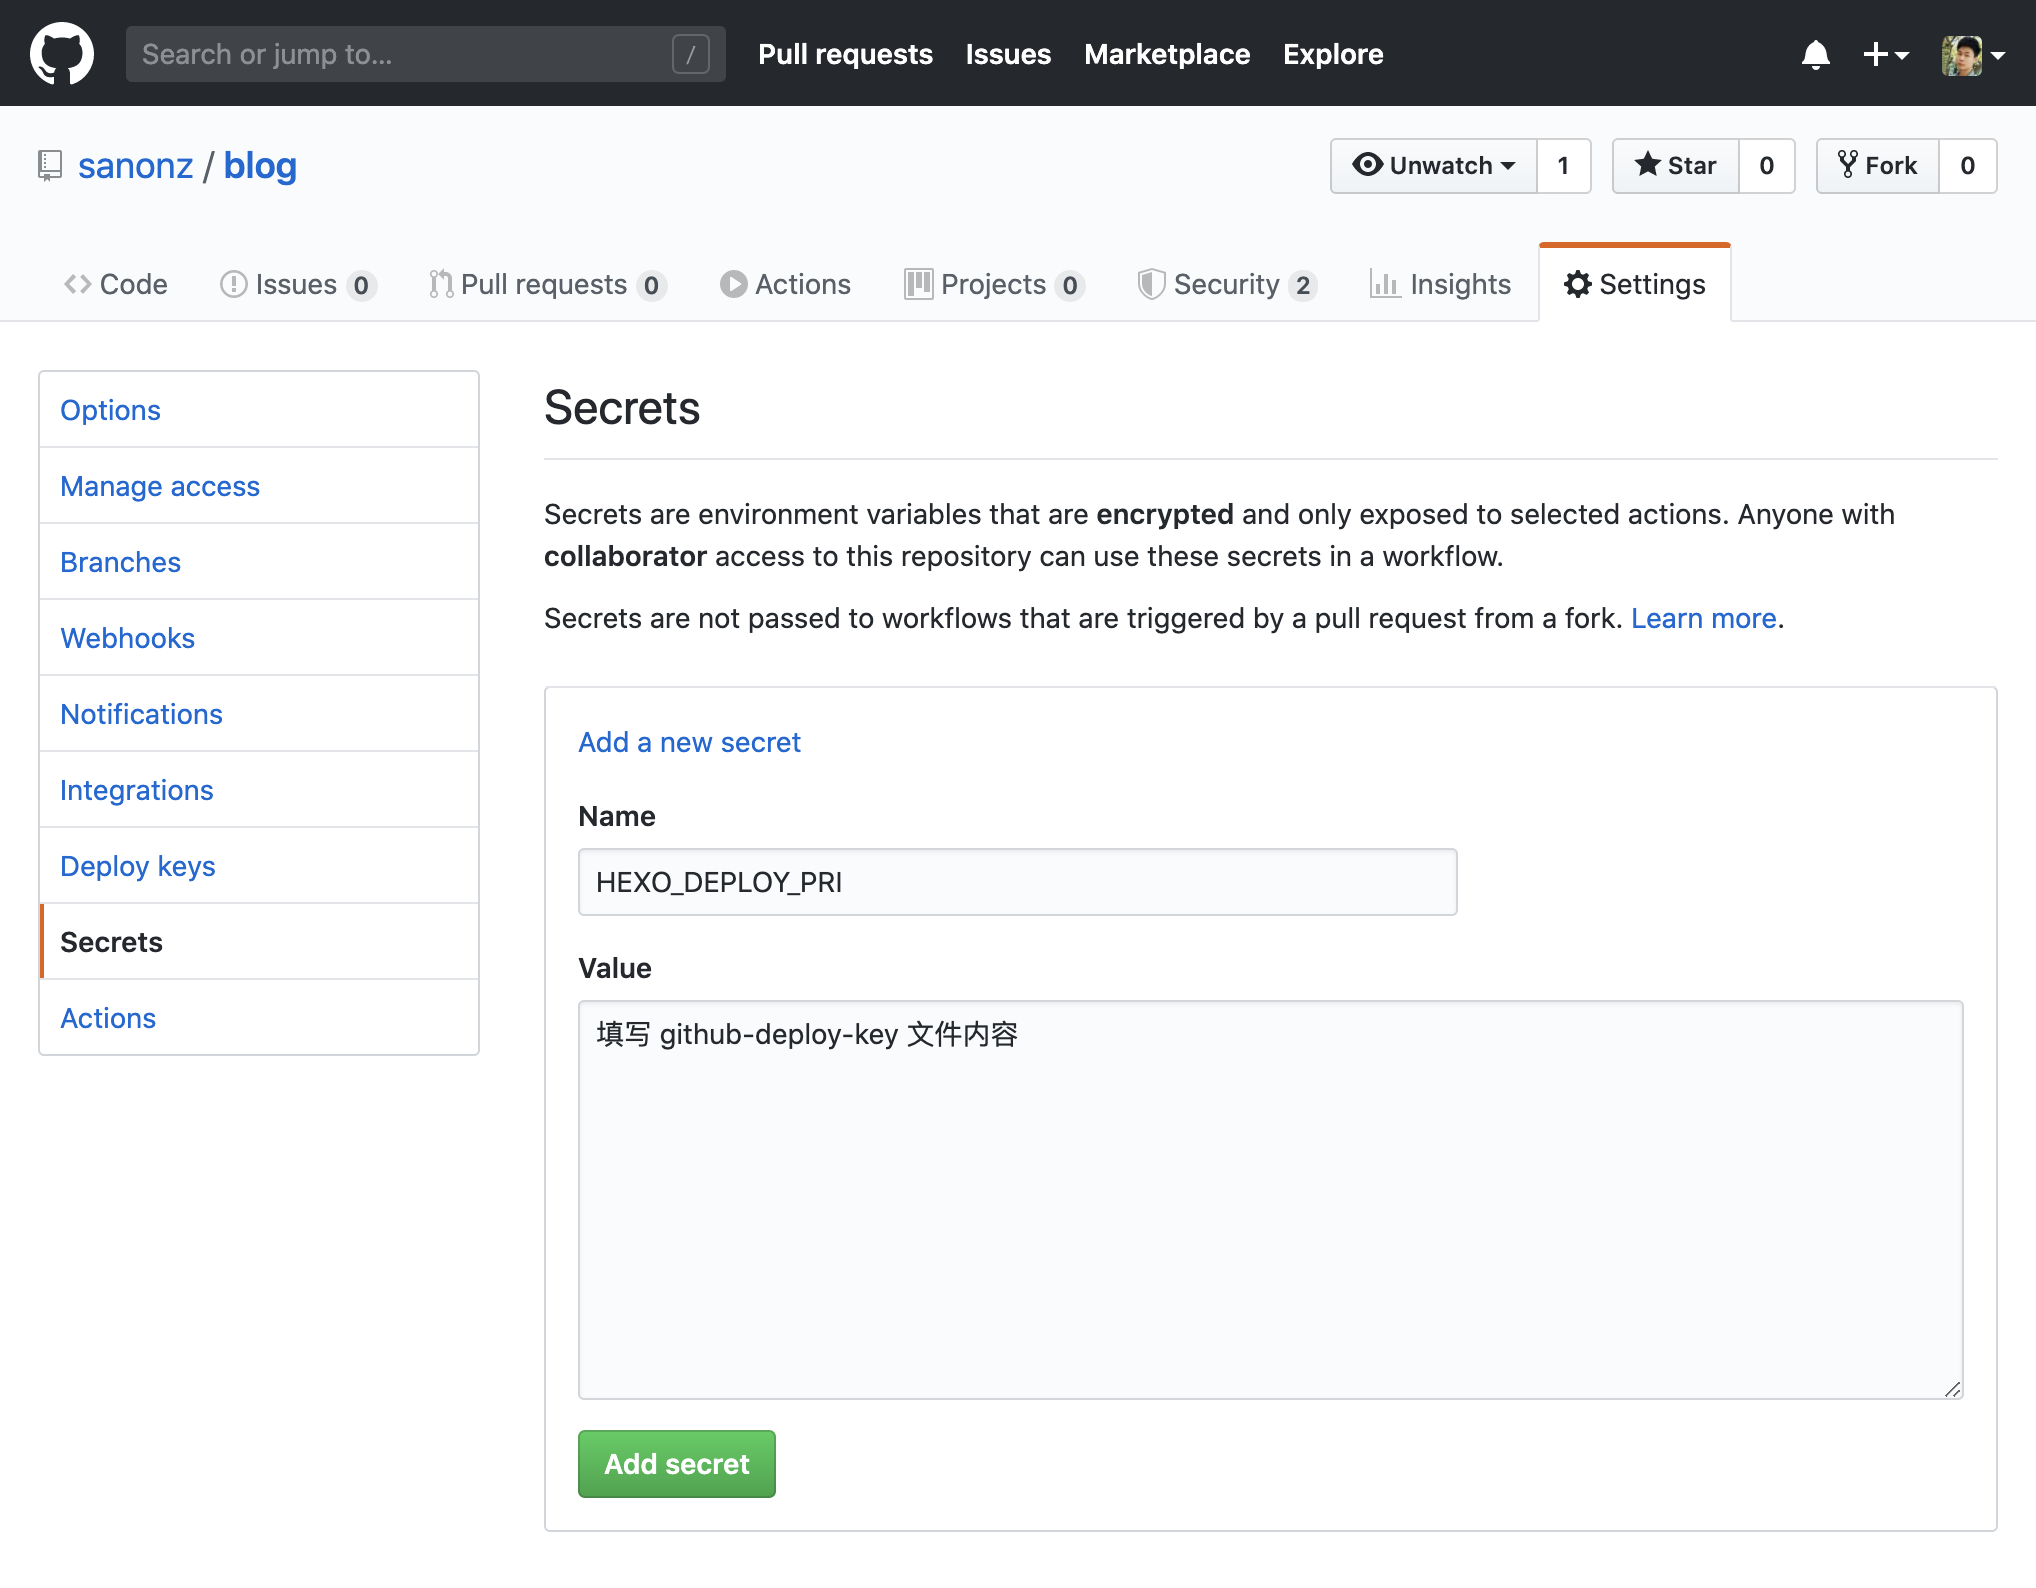
复制 github-deploy-key 文件内容,在 blog 仓库 Settings -> Secrets -> Add a new secret 页面上添加。
- 在
Name输入框填写HEXO_DEPLOY_PRI。 - 在
Value输入框填写github-deploy-key文件内容。

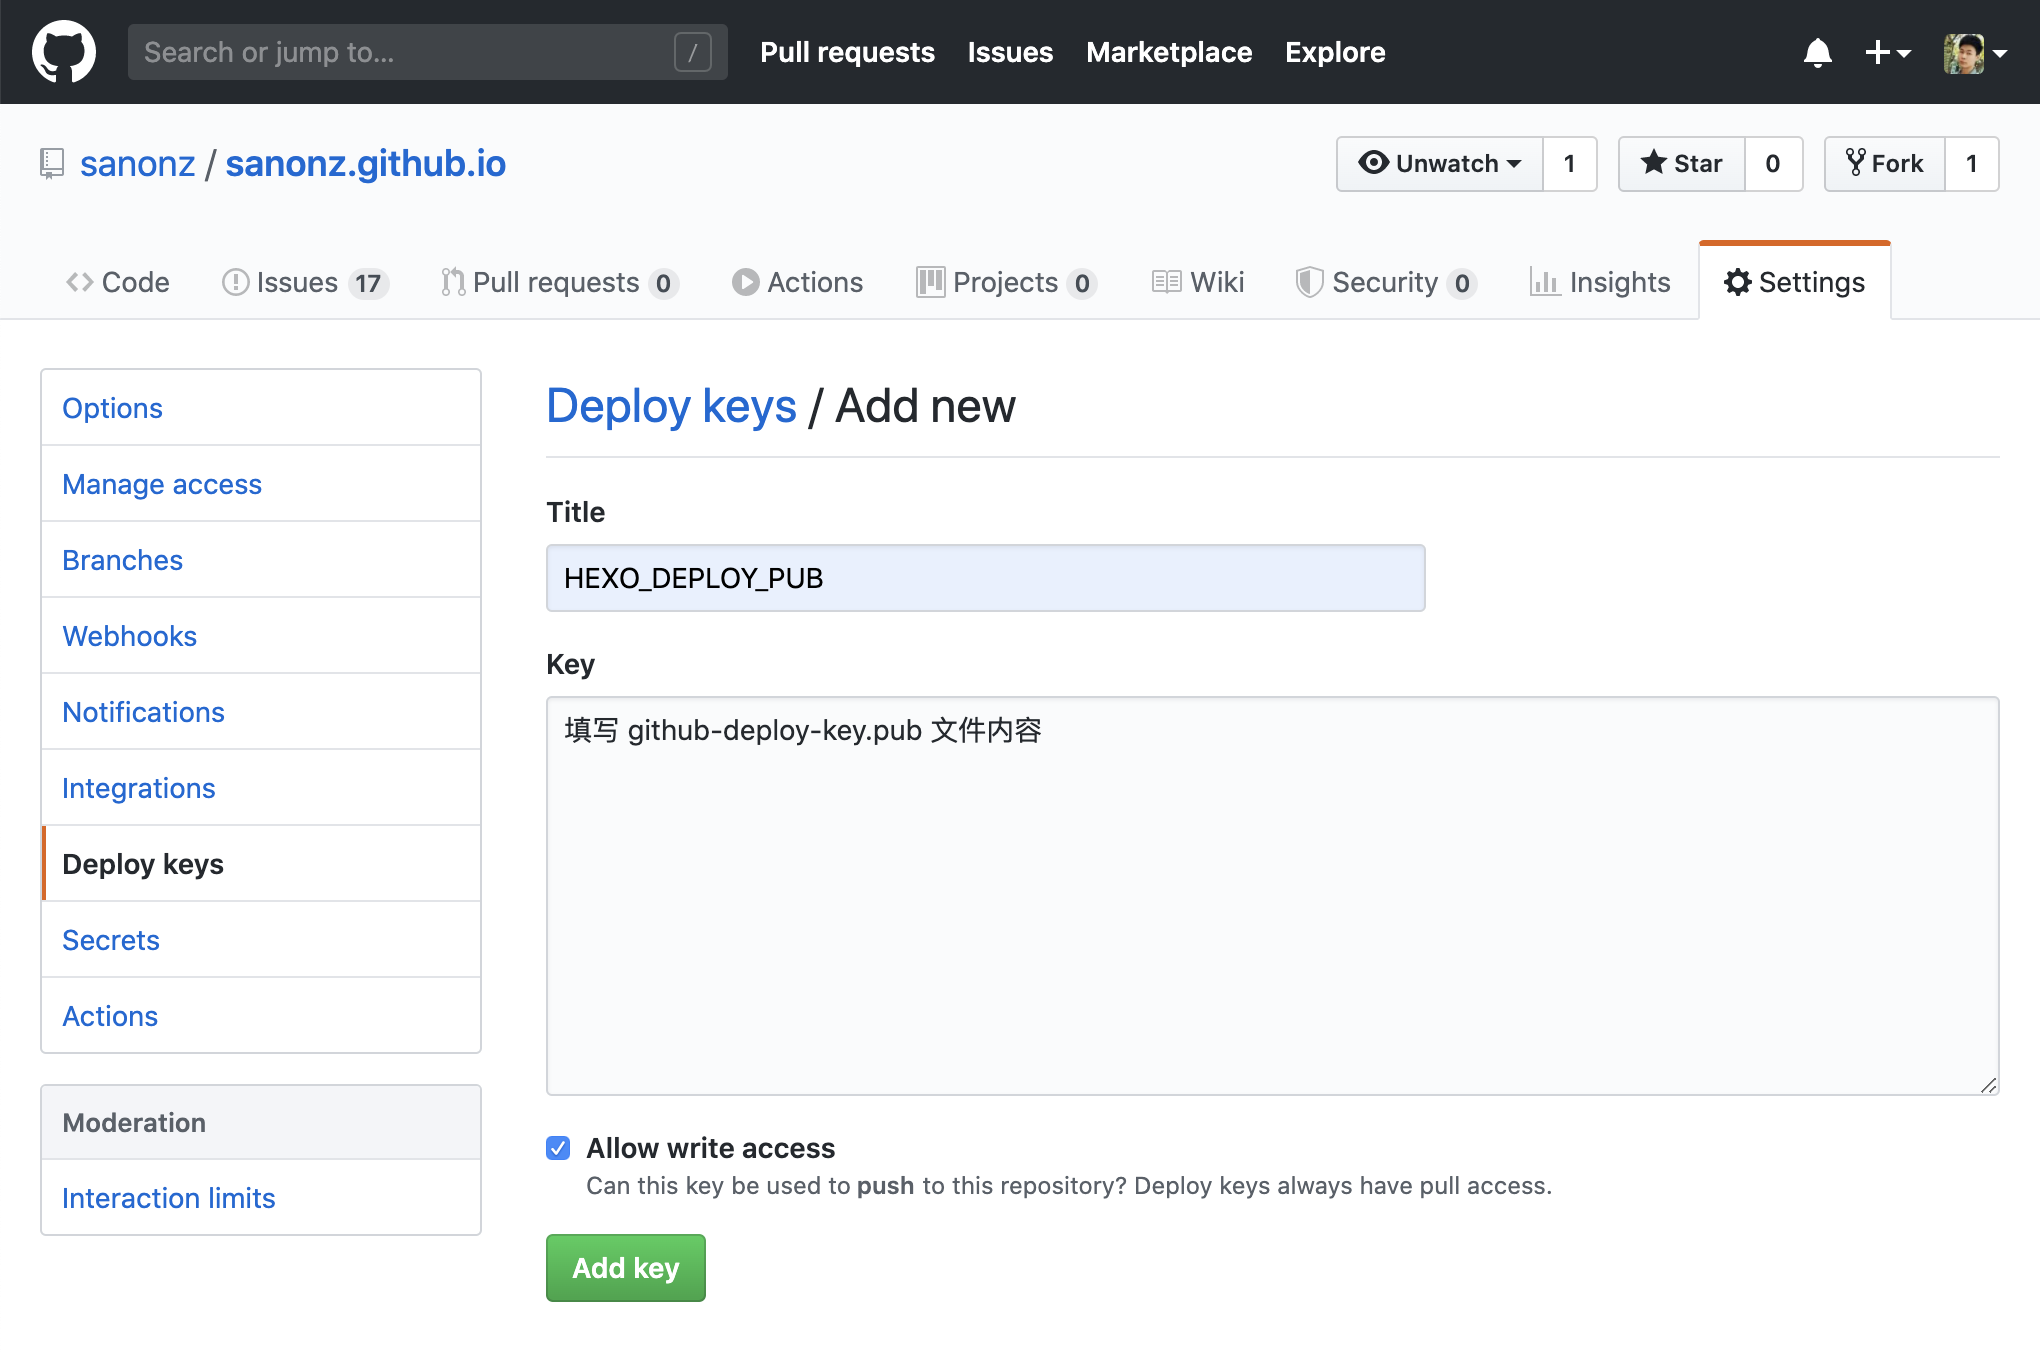
复制 github-deploy-key.pub 文件内容,在 your.github.io 仓库 Settings -> Deploy keys -> Add deploy key 页面上添加。
- 在
Title输入框填写HEXO_DEPLOY_PUB。 - 在
Key输入框填写github-deploy-key.pub文件内容。 - 勾选
Allow write access选项。

编写 Github Actions
Workflow 模版
在 blog 仓库根目录下创建 .github/workflows/deploy.yml 文件,目录结构如下。
blog (repository) |
在 deploy.yml 文件中粘贴以下内容。
name: Duncan's Blog CI/CD |
模版参数说明
name 为此 Action 的名字
on 触发条件,当满足条件时会触发此任务,这里的
on.push.branches.$.master是指当master分支收到push后执行任务。env
为环境变量对象
- env.GIT_USER 为 Hexo 编译后使用此 git 用户部署到仓库。
- env.GIT_EMAIL 为 Hexo 编译后使用此 git 邮箱部署到仓库。
- env.THEME_REPO 为您的 Hexo 所使用的主题的仓库,这里为
sanonz/hexo-theme-concise。 - env.THEME_BRANCH 为您的 Hexo 所使用的主题仓库的版本,可以是:branch、tag 或者 SHA。
- env.DEPLOY_REPO 为 Hexo 编译后要部署的仓库,例如:
sanonz/sanonz.github.io。 - env.DEPLOY_BRANCH 为 Hexo 编译后要部署到的分支,例如:master。
jobs
为此 Action 下的任务列表
jobs.{job}.name 任务名称
jobs.{job}.runs-on 任务所需容器,可选值:
ubuntu-latest、windows-latest、macos-latest。jobs.{job}.strategy 策略下可以写
array格式,此 job 会遍历此数组执行。jobs.{job}.steps
一个步骤数组,可以把所要干的事分步骤放到这里。
- jobs.{job}.steps.$.name 步骤名,编译时会会以 LOG 形式输出。
- jobs.{job}.steps.$.uses 所要调用的 Action,可以到 https://github.com/actions 查看更多。
- jobs.{job}.steps.$.with 一个对象,调用 Action 传的参数,具体可以查看所使用 Action 的说明。
第三方 Actions
使用第三方 Actions 语法 {owner}/{repo}@{ref} 或者 {owner}/{repo}/{path}@{ref} 例如:
jobs: |
一、调用 actions/checkout@v2 可以实现 Checkout 一个 git 仓库到容器。
例如 Checkout 当前仓库到本地,with.repo 不填写默认为当前仓库。
jobs: |
例如 Checkout 第三方仓库 git@github.com:sanonz/hexo-theme-concise.git 的 master 分支到容器 themes/concise 目录。
jobs: |
二、调用 actions/setup-node@v1 可以配置容器 Node.js 环境。
例如安装 Node.js 版本 v12 到容器中,with.node-version 可以指定 Node.js 版本。
jobs: |
可以在这里查找更多 Actions 以及使用方式 官方 Actions 市场。
配置文件
复制一份 https://github.com/sanonz/hexo-theme-concise/blob/master/_config.example.yml,放到 blog 根目录下,名为 _config.theme.yml,如果您已经配置过此文件,只需要把您的复制过来就行。
最终目录结构
blog (repository) |
把 _config.theme.yml 与 deploy.yml 文件推送到 blog 仓库,在此仓库 Actions 页面可以看到一个名字为 CI 的 Action。
执行任务
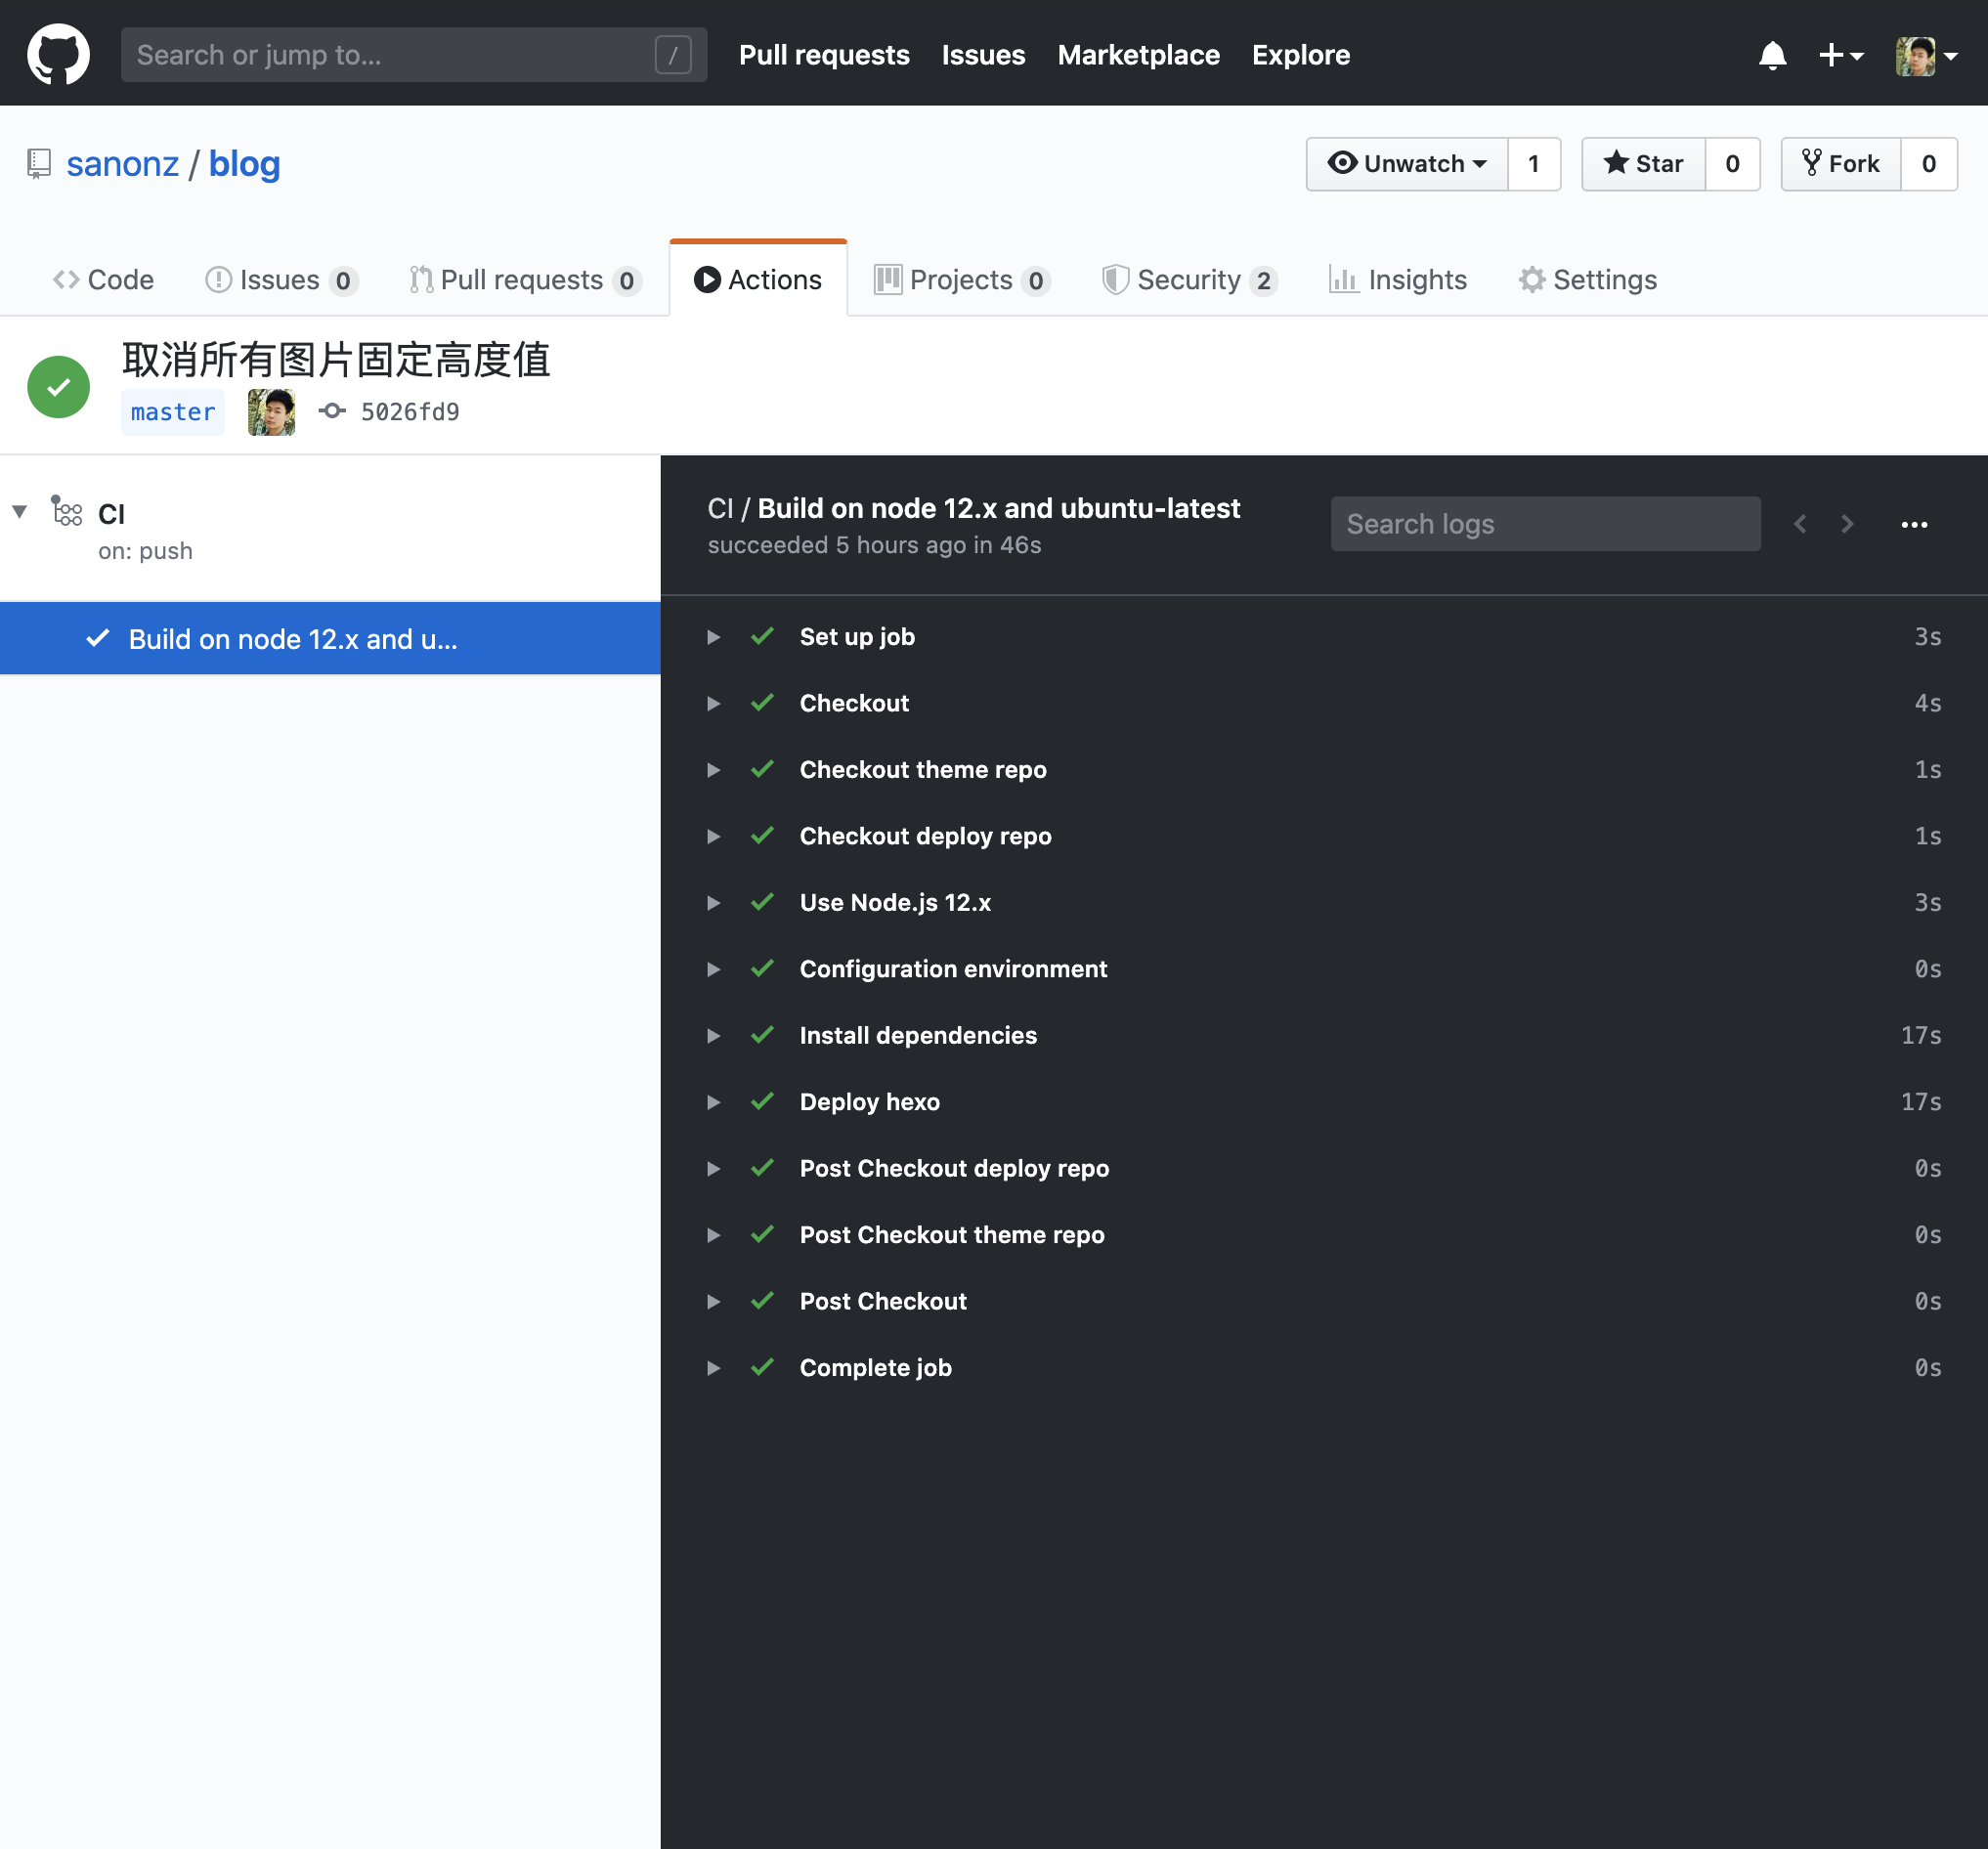
写一篇文章,push 到 blog 仓库的 master 分支,在此仓库 Actions 页面查看当前 task。

当任务完成后查看您的博客 https://your.github.io,如果不出意外的话已经可以看到新添加的文章了。
小结
偷懒是人类发展的动力,人都有偷懒的想法,目的就是为了让自己能够活得更好,经过几千年的不断发展,现在人偷懒的方式无疑更加的先进。
至此结束,感谢阅读。